INSTALLING SCHOOL BUS BELTLINE LETTERING
HOW TO INSTALL YOUR SCHOOL BUS BELTLINE LETTERING
Installing School Bus Decals – Beltline Lettering
So you have a brand new bus that needs some lettering. Maybe your bus has just been painted, and all that’s left is adding the markings. Whatever the reason, if you have any questions about installing school bus decals, we’re going to cover them here.
What we’ve assembled is a step-by-step “Application” guide. We will outline the tools, supplies, and information you will need to tackle the job of installation. While we will cover some generic location information, this page is not intended to encompass all legal requirements of decal placements or sizes. There are many States that have very specific requirements. These would be beyond the scope of this guide.
Installation of decals and marking for school buses is fairly straightforward. But, as we all know, proper planning can make any task much easier. It’s important to be prepared so that when something unexpected happens, you’re covered. Except for some body rivets, seams, and maybe a curved hood and fender, most surfaces on the modern school bus are flat and straight. This makes them the ideal surface for applying vinyl decals.
Even though this page is about school bus markings, the ideas and information would apply to the installation of cut graphics and decals for many types of vehicles.
So, to get started, this is what we will need…
Tools Needed
Tools – Equipment – Supplies
- Masking Tape
- Squeegee
- Heat Gun or Heat Torch
- Olfa® type knife or X-acto® Blade
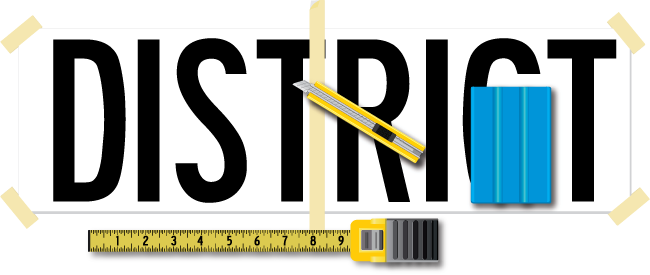
- Tape measure
- Straight edge
- Cleaner
- Paper Towel’s or Soft Cotton Cloth
- Ladder
- Extension Chord (if using a Heat Gun)
Optional:
- Scissors
- Stabilo®
- Rivet tool/brush
With the tools and supplies listed above (and the decals of course), you should be set for almost anything that comes at you. Let’s go ahead and break the list down and get specific.
Masking Tape
Masking Tape isn’t used in graphics installation to actually “Mask” anything. It’s used to hold graphics in place. This is helpful in holding large graphics and decals in place. Though many masking tapes can be used, we like to use tapes that will not leave glue and not damage painted surfaces. Safe release tapes are preferred. The Blue and Yellow safe release tapes by 3M are great. All tapes are not created equal. Read the labels to find what working surfaces and temperatures are recommended. The tapes will also have a working time. This is the amount of time they are able to be safely removed. Always work within this time.
Squeegee
Vinyl application tools come in many different sizes and materials. But, for the decals and striping that go on a school bus, we can limit our picks. A plastic squeegee will be adequate for our needs. The type of plastic squeegee should be left to the installer. Most likely the number of decals you install will dictate the squeegee that’s best for you. One option to consider is whether to have a squeegee that has a protective felt edge, or a protective sleeve on it. These are used to protect vinyl such as printed vinyl and reflective tapes.
Heat Gun or Heat Torch
A Heat Gun or Heat Torch serves several purposes in vinyl graphics applications. The heat from these tools is used to “Set” the glue in recently installed graphics. Heat will soften the glue on vinyl that are on vehicles and are difficult to remove. Heating is also used to change the memory of vinyl, making the vinyl conform around complex curves such as rivets and body seems. And lightly heating vinyl utilizes the vinyl’s memory to bring stretched or deformed vinyl back to its original shape. A heating tool is a must-have in the tool kit.
Note; A Heat Torch requires a bit of skill and can damage vinyl, as well as painted surfaces. For all school bus decals, a Heat Gun is sufficient.
Extension Chord
Necessary if using a Heat Gun. Carry as long a chord as possible. Remember to have the bus parked within reach.
Olfa Knife or X-acto Blade #11 and Holder
Cutting and/or Piercing tools are an important part of the MacGyver kit. Having one of these tools will aid in making clean cuts in vinyl backing paper, decal backing, and reflective backing. Sharp scissors can be used as well but the razor blades of these knives serve an additional purpose. When an unavoidable large air bubble get’s trapped under the vinyl, the sharp point of an X-acto Blade or Olfa Knife can make a nice clean pierce in the vinyl. This aids in releasing the trapped air without damaging the vinyl graphics. Of course, there are many possible blades or knives that can be used, use what you’re comfortable with. I just mention the Olfa and X-acto out of personal preference.
Note; The X-acto #11 blade point is extremely sharp and has a very pointed tip. We have found this to meet all of our needs in removing the air from bubbles. Though we should mention, that there are air release tools made specifically to pierce the vinyl with a small needle-like point (3M 391X Retractable Air Release Tool). Some might find one of these to be better suited for them.
Tape Measure

Any Tape Measure will due, so long as you have one. Consider adding a small metal ruler to your tools list. We find these small metal rulers come in handy to quickly double check a measurement. We see the State inspectors using the 6-inch metal rulers regularly to inspect school bus lettering requirements.
Straight Edge
Although not necessary, a straight edge can be useful for many types of vehicle graphics installation. Use a straight edge along the many straight constructed areas of a school bus to check graphics. Use against the straight lines of the bus rub-rails, luggage compartments, straight hoods, doors, etc.
Cleaner
We recommend carrying 2 cleaners
1 Spray bottle with a Simple Green solution mixed 1:30 or 1oz Simple Green to 4 Cups Water
1 Bottle of 70% Isopropyl Alcohol
Paper Towels and/or Soft Cotton Cloth
Carry plenty. Even brand new buses come in with heavy road grime.
Optional Tools and Supplies
Scissors
A pair of scissors can come in handy for cutting the vinyl backing papers away during installation. Consider having a pair handy just in case.
Note; Some suppliers of school bus lettering give all the necessary lettering on a single large sheet that requires cutting the lettering apart in order to install it. Scissors would make that process easier than attempting to cut with a blade or knife.
Stabilo®
A Stabilo is a type of pencil used by the sign industry. Like a grease pencil, the marking can be wiped away. Unlike a grease pencil the markings of a Stabilo are water-soluble, so clean up is much easier. If you are skilled at applying graphics without taping in place first, a Stabilo would make an excellent addition to the tools list.
Rivet tools
Rivet tools and rivet brushes are tools that are specific to vinyl sign installers that encounter rivets during their jobs. Mostly used by a wrap or large format graphic installers, a rivet tool can help speed the process of securing and forming vinyl around rivets. While we have used the rivet brushes when doing large commercial wraps, we haven’t really found a need to use them in installing school bus decals.
Ladder
Okay, so you really don’t need a ladder to install beltline lettering. But, it’s always a good idea to have one. I always have a ladder on board. You will need a 4ft – 6ft step ladder. 6 being best.
Note; A ladder will be necessary for the “SCHOOL BUS” decals, EMERGENCY DOOR, and EMERGENCY EXIT. If you have manufacturer’s logos to install above windows on drivers and entrance sides. And finally if there are any roof Identification decals such as roof numbers.
Now we have all of our tools and supplies at the ready. We will start with the beltline lettering.
Beltline lettering Installation
What will be covered
- Clean and Prep Surface
- Layout and Placement
- Vinyl Installation Methods
- Installation
Clean and Prep Surface
Temperatures should be above 55° F and surfaces that are in direct sunlight should not be over 100° F, or too hot to the touch. Very windy and dusty conditions cause dirt to be trapped under decals and causing an undesirable application. Surfaces should be clean and free of all dirt, wax, silicone, and oils. Use Simple Green mixed as described above to clean all surfaces. Now spray or dampen a lint-free cleaning cloth with your 70% Isopropyl Alcohol solution. Wipe all surfaces once more and allow several minutes to dry.
Note; Isopropyl Alcohol does a great job of removing petroleum-type films from surface that would prevent vinyl from adhering.
Layout
Layout of the beltline lettering is subjective. Many contractors use a specific typeface and place the beltline lettering in a precise location for corporate “Branding” purposes. There are also schools which do the same. If you are applying lettering to a unit that already has placement specified, you’re probably going to want to skip this section.
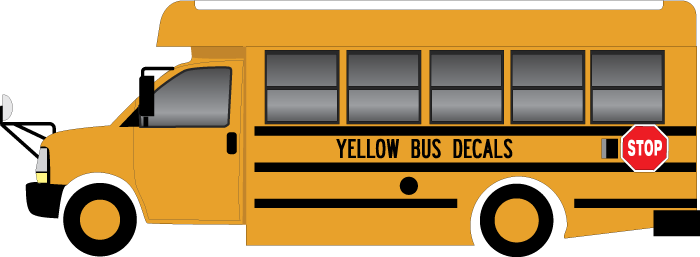
When we look for a beltline lettering installation point, we’re not necessarily looking for the center of the bus. Look for an area of the beltline where lettering can be placed with as little interference as possible. The example above shows a Collins school bus that has no running lights on the beltline, and the Stop Arm is located far enough back to allow for an easy layout. With a little planning, many obstacles such as lights, emblems, doors, seems and rivets can be avoided. A very important part of layouts is consistency. Develop a set of layout “Rules” that work and stick to them. If this is done, then all buses will have uniformity. Branding isn’t strictly a corporate benefit. Students rely on quick identification of the school bus they are going to ride.
If the bus is scheduled for bodywork make sure plenty of pictures are taken before work begins. This way, the bus can be re-lettered precisely as it was before.
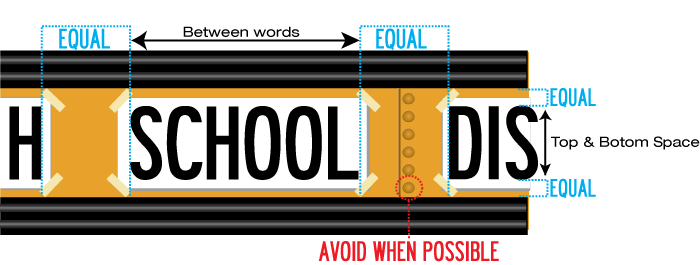
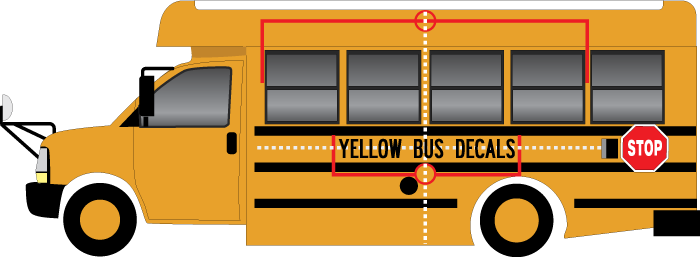
School Bus Lettering Placement
- Tape all Vinyl decals in place
- Lettering “Centered” in beltline (Equal space above and below)
- Equal space between words
Okay…how does it look? Great. Let’s install it!
Installation
There are several methods of installing Vinyl Lettering and decals. In this post, we will focus on the easiest of them, the “Hinge” method. The hinge method is basically taping the vinyl decals in place. Then applying half of the Decal or Graphics, while the tape holds the opposite side in place.
Let’s illustrate the Hinge Method to give us a better idea of how it’s done.
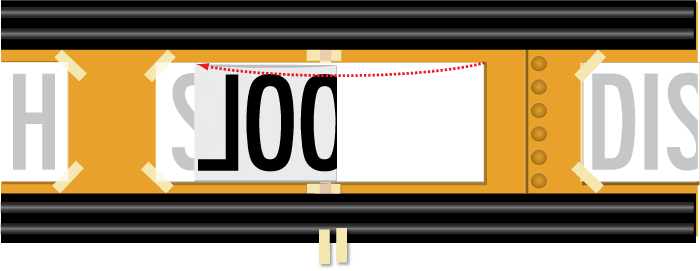
Step 1. The Placement
Apply masking tape to 4 corners of your vinyl lettering/graphics. Add a vertical hold-down piece of tape down the center, this is your hinge. Add additional pieces to top and bottom of hinge tape if needed (as illustrated) The white paper over the top of the vinyl lettering is the Application tape, also sometimes called Transfer Tape. Transfer Tape has a light adhesive that holds the vinyl pre-spaced lettering. It’s used to “Transfer” the vinyl lettering and graphics to the surface it’s applied to.
Step 1
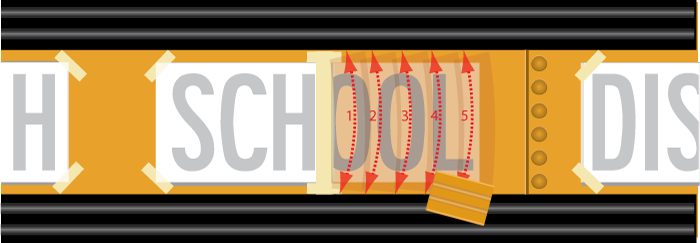
Step 2. The Hinge
Remove two right corner pieces of Masking Tape and place them on the rub rail. “Slowly” peel Transfer Tape away from the vinyl backing paper. Peel to the center tape “Hinge”. Be careful to not pull too far, as you will pull hinge tape away from the bus. Also, make sure that vinyl lettering stays on Transfer Tape and not the Backing Paper. The illustration below shows how it should look.
Step 2
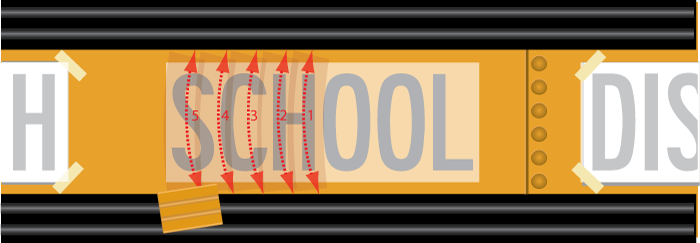
Step 3. The Peal-Away
Use one of the pieces of Masking Tape from the rub-rail to hold the Transfer Tape and vinyl graphics you just peeled from the backing paper. Cutaway vinyl Backing Paper with a razor knife or scissors. If using a razor knife be careful not to scratch or cut into the painted bus surface.
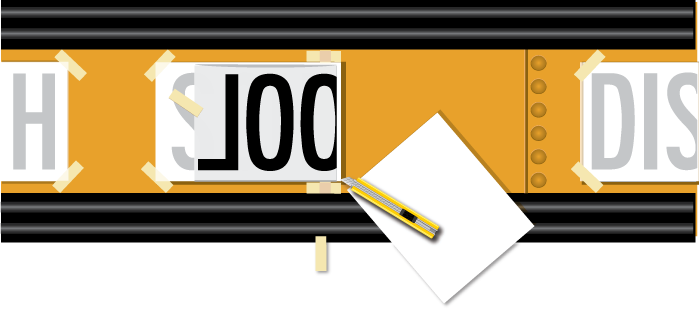
Step 3
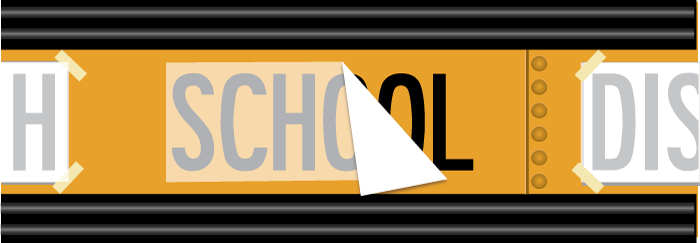
Step 4. Laying the Vinyl Down
Carefully place vinyl and transfer tape on the bus beltline surface. When placing down your graphics hold the top and bottom corners. Pull tight and straight- enough that vinyl lettering or graphics is taught and not wrinkled, but not so tight that it pulls hinge tape away from the bus surface.

Step 4
Step 5. The Squeegee Down
Squeegee the surface. The goal is to use the squeegee to force air from the vinyl. While applying firm and even pressure squeegee the face of the material using semi-circular strokes outward- and away from the center.
Step 5
Step 6. Pull, Place and Repeat
Remove all masking tape. Remove the vinyl backing paper and repeat Step 4 and Step 5
Step 6
Step 7. The Final Step
Carefully remove the application tape, Do not pull directly away from the vehicle, as this may pull freshly installed vinyl off. Instead remove slowly, at a hard downward angle. Cool and/or damp weather may prevent the vinyl from properly bonding. If adhesion issues arise from cold and/or damp surface temperatures, a heat gun may be used to warm and dry the bus surface prior to installation.
Step 7
As stated above, there are several methods of installing Vinyl Copy. But when it comes to what method is used the most, especially when starting out. The Hinge method wins, hand down.
Larger graphics like the “SCHOOL BUS” and rear “CAUTION” wording are just so much easier using this method.
Wrapping it up
So that’s it, you’ve got you’re School Bus lettering installed…and it looks great, well done! You can apply these techniques to all of the decals, lettering, and striping that goes on a school bus, big or small. Just practice…then practice, and above all, practice. The more practice you get, the better it will look, and of course, we want that school bus to look its best.
After all, we’re “Identifying What’s Important”.