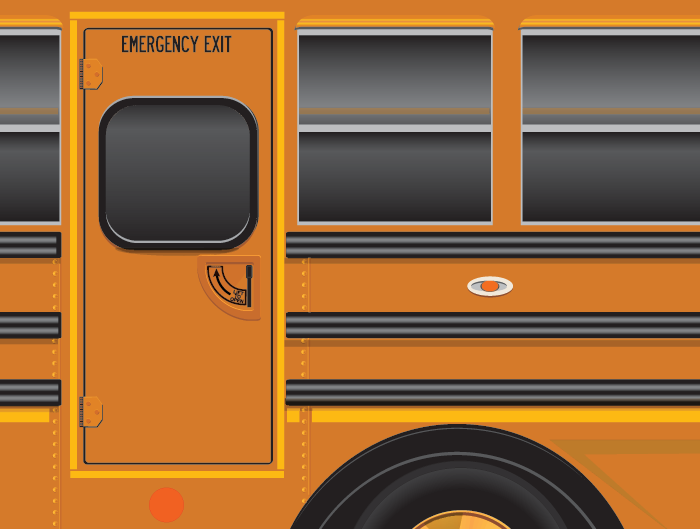
Lettering School Buses in California
California school bus lettering, identification, and markings follow both federal and state standards. While some of the standards are universal, there are quite a few school bus lettering standards that are unique to California. The AHJ or Authority Having Jurisdiction in California, is the California Highway Patrol. Each school bus is inspected by a CHP Inspector before being permitted to go into service. The inspection is thorough from head to tail light. Missing, misplaced, and/or improperly sized school bus lettering can potentially keep a bus from delivering students. And we don’t want that. Using California’s School Bus Standards as well as Federal Standards we’re going to cover some of the lettering requirements and decals that are needed. Unless otherwise noted, the following requirements are mainly for school buses manufactured after January 1992.School Bus Signs
• Identification Signs and numbers can be either painted or adhesive decals • All school bus signs shall be maintained and legible • Unless otherwise stated, all school bus signs shall be solid black on a National School Bus Yellow (NSBY) background. • Signs applied to curved or slanted surfaces shall have a projected height and width that comply with the size requirementsSchool Bus
The words “SCHOOL BUS” shall be displayed in uppercase lettering not less than 8 inches in height. The letters on the “SCHOOL BUS” signs shall be of proportionate width and will be located above the windshield and above the rear windows of the bus.Stop When Red Lights Flash
On the rear of all California school buses, below the rear windows, will be a plainly visible sign containing the words “Stop When Red Lights Flash” in letters not less than six inches in height. The letters shall be of proportionate width. Note; While the California code doesn’t state that the words “Stop When Red Lights Flash” be all uppercase, it has been our standard of manufacturing these signs in uppercase.“STOP WHEN RED LIGHTS FLASH” Decals
Carrier Names and Contractor Names
The name of the motor carrier is installed below side windows on both side of school bus in lettering that is not projected less than 4 inch in height, no more than 6 inch in height Some schools are operated by contractors instead of the school, so as an alternative, a school bus may be lettered with both the school name as well as the contractor or district name. For this alternative contractor lettering, the school’s name shall be on the main beltline below side windows in 4 to 6 inch lettering (Projected at No less than 4″ and no more than 6″), and the district or contractor name shall be displayed in 2″-6″ lettering. Personal Note- On school buses that carry both the school name and the contractor name, we have generally manufactured the contractor name in 2″-3″ lettering, and located the contractor name in front of rear axle (see image example below). Check with the contractor and/or CHP Inspector if there are any questions.Allowed
• Carrier names or lettering styles which constitute a registered trademark may include a registered trademark symbol displayed in close proximity to the carrier name. • Special Carrier lettering styles so long as they are legible from a distance of over 50 feetNOT Allowed
• Addresses • Telephone Numbers • Stripes • Slogans • Graphic designs • Lettering styles which substantially reduce the legibility of the required sign from a distance of 50 feet
California Side Carrier Lettering
Lettering size if using “School Name” and “Carrier or Contractor”
Carrier Identification Number
The state of California issues carriers a unique number known as a “CA Number”. This assigned carrier number is to be at least 2 inches in height. The number begins with the letters “CA” then is followed by the assigned number (a space can be placed between the letters CA and the assigned numbers, example; CA 12345) 3 points to remember, 1. CA Number shall be displayed in at least 2 inches in height (If applied over curved surfaces be aware that number may “Display” smaller) 2. CA Number shall be placed center of carrier name 3. CA Number shall be placed no more than 24 inches from carrier name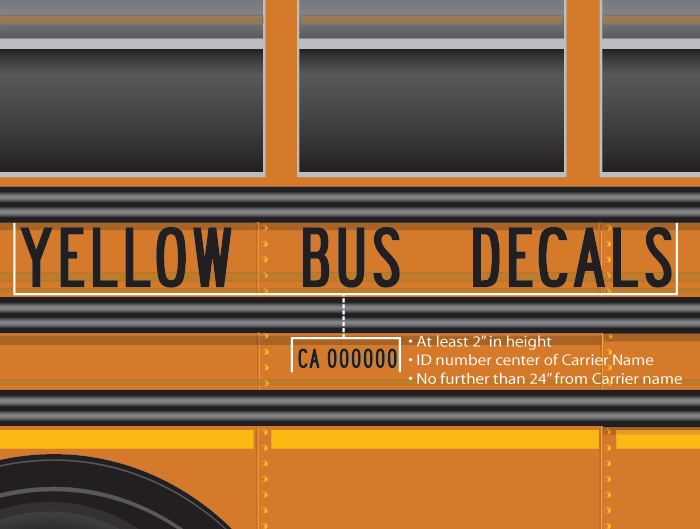
California Carrier ID Number
CA Number location and size details
ICC, PUC, USDOT Numbers School buses may display the carrier’s valid operating authority or identification number assigned by the Interstate Commerce Commission, the California Public Utilities Commission, or the United States Department of Transportation, in the manner specified above for carrier identification numbers, instead of the carrier identification number assigned by the department.Emergency Exit Signs
When it comes to properly labeling emergency exits, we use several sources. Federal standards (FMVSS) and California Standards (Title 13). If there are conflicts between the standards, California Title 13 makes it clear that federal standards prevail.California Title 13:
• “A sign reading “EMERGENCY EXIT” in upper case letters 2 inches in height shall be on the exterior of the bus on or above each emergency exit.” • For exterior or interior emergency exit signs, the words “EMERGENCY DOOR” in upper case letters may be used to identify floor-level emergency doors instead of the words “EMERGENCY EXIT” (2 inches in height). • Exterior emergency exit signs may have a white background if located above the emergency exit in the white area of school buses with white roofs • Interior emergency exit signs shall be of any color that contrasts sharply with the background • School buses manufactured prior to January 1, 1992 may have emergency exit signs applied as decals on the window glass of the emergency exit. If this option is exercised, the emergency exit decals shall meet the size and wording requirements of this subsection, but need not meet the color requirements. • Roof emergency exits shall be identified the same as all other emergency exits, except that emergency exit signs for roof exits need not meet the size and color requirements if they are clearly identified as emergency exits on the interior and exterior of the emergency exit assembly as supplied by its manufacturerFederal Standards 571-217:
• “For emergency exit doors, the designation shall be located at the top of, or directly above, the emergency exit door on both the inside and outside surfaces of the bus • “For emergency window exits, the designation shall be located at the top of, or directly above, or at the bottom of the emergency window exit on both the inside and outside surfaces of the bus. • On the inside surface of each school bus with one or more wheelchair anchorage positions, there shall be a label directly beneath or above each ‘‘Emergency Door’’ or ‘‘Emergency Exit’’. The label shall state in letters at least 25 mm (one inch) high, the words ‘‘DO NOT BLOCK’’ in a color that contrasts with the background of the label • Concise operating instructions describing the motions necessary to unlatch and open the emergency exit shall be located within 15 centimeters (6 Inches) of the release mechanism on the inside surface of the bus. These instructions shall be in letters at least 1 centimeter high (approx 1/2 inch) and of a color that contrasts with its background Examples: (1) Lift to Unlatch, Push to Open (2) Turn Handle, Push Out to Open • The designation for roof exits shall be located on an inside surface of the exit, or within 30 centimeters of the roof exit openingFMVSS 571-217 Compliant Decals As far as the exterior “EMERGENCY EXIT and “EMERGENCY DOOR” signs, it does appear that there is slight ambiguity on placement. California states that exterior emergency doors “On or Above” the emergency exit, while FMVSS States “Top of or Directly Above”. Sometimes you may see that the “EMERGENCY DOOR” or “EMERGENCY EXIT” decals are placed in the middle of the emergency door, below the door glass. While, technically the decal is “On” the door, Federal Standards state that emergency door decals should be located above the door or on the top of the door. For this reason we recommend placement at top or above emergency doors whenever possible. Just to recap
Interior Emergency Exit Signs and labels
• “EMERGENCY EXIT” Placed on top or above all emergency exits • 2″ Letters must contrast with background • “DO NOT BLOCK” bust be at top or above every exit on buses equipped with 2 or more wheelchair anchorage points • Concise instructions must be place within 6″ of all release mechanisms • Instructions must be at least 1/2″ letter height • Instructions lettering must contrast with background • “EMERGENCY DOOR” may be used if door exit extends to floor level • Roof emergency exits do NOT have size or color restrictions so long as they are clearly identified as emergency exits on the interior and exterior of the emergency exit assembly as supplied by its manufacturer.Exterior Emergency Exit Signs and labels
• “EMERGENCY EXIT” Placed on top or above all emergency exits • Must project at least 2″ in height • Must be Black • Must be placed on NSBY Background, unless placed on the White area of a White painted roof • “EMERGENCY DOOR” may be used if door exit extends to floor level • Roof emergency exits do NOT have size or color restrictions so long as they are clearly identified as emergency exits on the interior and exterior of the emergency exit assembly as supplied by its manufacturer. The identification of emergency exits is of significant importance, as they give clear and quick visual representation to first responders in a variety of emergency situations.Exterior Emergency Exit Sign Examples

California emergency exit decal
On the rear of school buses, whenever you can, place the “SCHOOL BUS” sign as high as possible. This can give you the room needed to place the emergency exit decal below the “SCHOOL BUS” sign, which will meet the standards of FMVSS 571-217
Emergency Door 571-217
Use the FMVSS 571-217 definition and, when possible, place the decal at the top of, or above all emergency exit doors.
Emergency Exit Reflective Markings
Federal Motor Vehicle Safety Standards call for all emergency exits to have the exit perimeter outlined in retroreflective tape. Use yellow retroreflective tape to outline all yellow painted surfaces, and white for emergency roof exits where the roof is painted white. The width of the reflective striping is 2.5 centimeters (1 inch). The material is of a grade that meets NHTSA, Department of Transportation reflectivity test (571.131 s6.5 Table 1)Unit or Bus Numbers
Your unit numbers or Bus numbers are the numbers that have been assigned to a particular school bus by the company or school that operates the bus. According to California Title 13, your school bus must have unit or bus numbers that are,”displayed in characters at least 4 inches in height“. The wording is important. What this means is, if you have a 4” unit number, and you place it on a front engine cover with a horizontal slant, it may display a height of less than 4 inches, which may cause a failed inspection.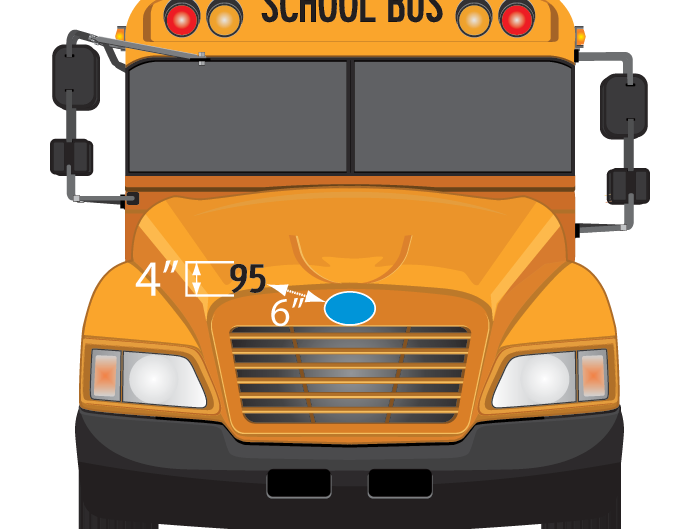
California unit number example 1
(1) Unit number must display at least 4″ in height. Make unit number large enough to achieve the minimum height when placed on curved surfaces.
(2) Unit number must be at least 6″ from manufacturers logos, and any other required sign. (12″ from additional signs)
Roof Mounted Unit Number
As an option, you may also have a roof number for aerial identification. There is no size restriction, but the number must be black and must be placed on a white or yellow Non- reflectorized background. The optional roof aerial identification unit number may be painted or formed from black reflective material that reflects white light.Fuel Labeling
For fuel labeling we will use a combination of California standards, as well as NFPA. Because alternative fuels are becoming more and more common, and are relatively new, these labeling standards are continually being discussed, refined, and amended. For this section we will go over some of the basics of proper labeling.Diesel, Ultra-Low Sulfur Diesel, Unleaded
As a general rule, identify fuel type, as well as any special instructions at fuel fill. Use at least 1/2″ black lettering. Keep in mind that consistency among a fleet is important. Should a fleet have, for example, Type A school buses where some are fueled by diesel, and others fueled by unleaded, costly mistakes can be avoided by applying consistent branding that differentiates the two.CNG • LNG • LPG Fuels
California requires that either • Depending on the type of fuel used, the letters “CNG”, “LNG”, or “LPG” shall be displayed as near as possible to the area of the location of the fuel tank. The letters shall be at least 1″ in height, Block Letters, and of contrasting color. or if this labeling isn’t used, as an alternative • Display on each side of the vehicle the words or letters at least 1/4″ in high indicating that the vehicle is fueled by liquefied Petroleum Gas or Natural Gas. National Fire Protection Agency • NFPA Compliant Reflective Diamond – locate on lower rear of vehicle, preferably engine cover, NOT on Bumper • NFPA Compliant “MANUAL SHUT-OFF VALVE.” decal – Locate at Manual Shut-off Valve location • NFPA Compliant Label at Fuel ReceptacleOther Optional Signs
Handicapped Sign.
• A white-on-blue international handicapped (wheelchair) sign may be displayed on any school bus equipped to transport pupils confined to wheelchairs. • One sign may be displayed on each side and on the rear of the bus. • Each sign shall be no larger than 12 inches in height and the width shall be proportional to the height. • The sign shall not obscure any required sign on the bus.Additional Signs.
• Signs consisting of numbers, letters or illustrations with contents limited to special identification, bus routing information, warning against unauthorized entry, or an acknowledgment of a sponsor’s donation of a school bus may be displayed. • No color restrictions apply to this sign. • The display area shall be a maximum of 12 inches by 12 inches on the sides of a school bus below the bottom edge of the passengers’ side window glass and not closer than 12 inches from any required sign.Reflective Material
• Any required sign may be painted with, or formed from black reflective material that reflects white light. • One reflectorized yellow horizontal stripe of any length and not exceeding 12 inches in width may be on each side of a school bus. The carrier’s name may be superimposed over the stripe, but if so, shall not be reflectorized as otherwise permitted in subsection • Optional signs and their backgrounds shall Not be reflectorized. • The rear bumper of a school bus may be marked with diagonal reflectorized material. Keep in mind that the reflective bumper striping must comply with California Vehicle Code Section 25500. Vehicle code 25500 states thatLimitations on school bus markings
• Colors, signs, bumper stickers, numbers or reflectorized material not required or specifically permitted by this article shall not be permitted on school buses.Vehicle Information Labels
• Small exterior tags or labels with lettering of not more than one inch in height indicating operational information such as, but not limited to, type of fuel, tire pressure, air reservoir drain locations, coolant filler location, etc. are not considered signs for the purposes of this section. • Markings on fuel containers and fuel filler locations for liquefied petroleum gas (LPG), compressed natural gas (CNG), and liquefied natural gas (LNG) shall comply with the marking requirements for those containers as specified in this title and Vehicle Code Section 27909 regardless of the requirements of this section. • Vehicle markings required by National Fire Protection Association Standard are permitted.Manufacture Logos
Logos of the manufacturer(s) of a school bus are not considered signs, however, logos shall not be displayed within 6 inches of any required sign. Exterior signs of any size representing the dealer or distributor of the bus are not permitted unless the dealer or distributor is either the manufacturer of the bus or, in the case of school buses manufactured in two or more stages, the final stage manufacturer. Signs on step well risers that are visible through door glass are not considered to be on the exterior of the bus.Final Words on California School Bus Lettering
As is evident from Title 13, the standards for California school bus lettering are well-defined, and with good reason. School buses come in many shapes and sizes. Branding school buses uniformly assists in what we like to refer to as the “3 I’s”. Inform- Stop When Red Lights Flash, This bus stops at all railroad crossings, etc. Instruct- How to open an emergency window, how to release an emergency latch, how to open an emergency door, how to…etc. Identify- Fuel Locations, Carrier Name, Unit Number, School Bus, Emergency Exits, etc.![]()